- 27
- 4月
Smart Lighting Design and Application – ‘Home Mode’ Setup Guide
Smart Lighting Design and Application – ‘Home Mode’ Setup Guide
Sunrise and sunset occur every day, and we experience spring, summer, autumn, and winter each year. In this fast-paced world, our rush for life sometimes causes us to overlook many things, including the importance of rituals in our daily lives. In the morning, we are naturally awakened by the light comparable to sunlight; The light will sweep away the tiredness: at night, the soft light gradually dims, and a good night’s sleep begins.
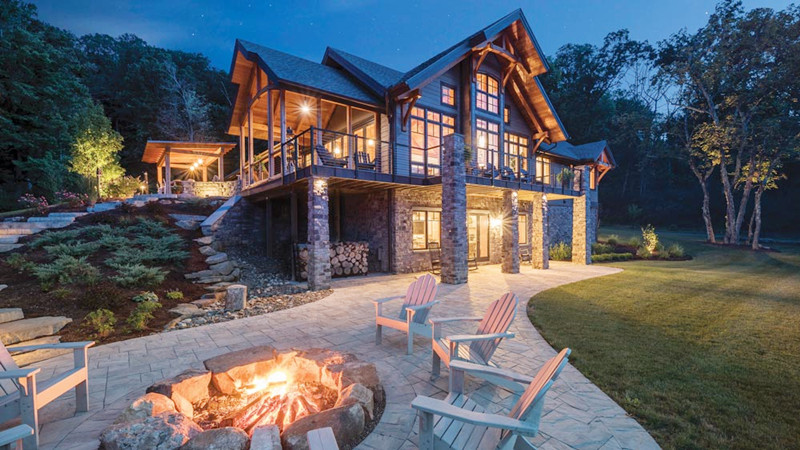
Intelligent lighting offers a comfortable and convenient lifestyle that inspires us to explore a better life. This article describes how to design smart lighting scenarios for different times of the day (see Figure 1). These scenes represent the fundamental modes of home smart lighting, suitable for everyone’s life.
Going Home’ Mode
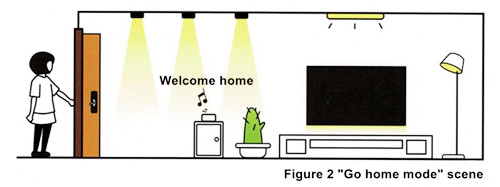
The ‘Going Home’ mode – a ritualistic sense of life commences upon returning home. Even the act of going home can be enhanced with a sense of ritual. In the past, arriving home meant fumbling for the key to unlock the door and then groping in the darkness to find the light switch. However, with intelligent lighting design, when we unlock the door, the lights in the house illuminate one by one, accompanied by the voice of the speaker saying ‘Welcome Home’ (see Figure 2). This simple gesture fills the moment with the warmth of home, even after a tiring day at work. Hence, a custom-designed intelligent lighting scene can effortlessly accentuate the feeling of technology and high-end home design.
Similar to the ‘home mode’ feature in many high-end cars, which illuminates the owner’s way home, the smart home system utilizes the smart linkage function to configure hardware devices into scenes. By leveraging intelligent lighting with grouping and delayed settings, a progressive lighting effect can be created.
1 .”Home Mode” Scene Design Tips
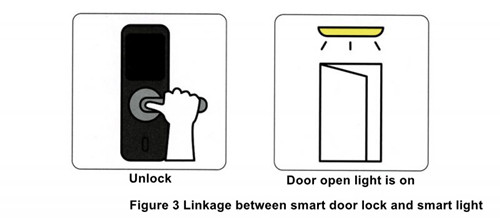
Linking lamps and locks involves considering three key elements. The most ceremonial feature, the ‘Going Home Mode,’ activates the moment the door is opened. The desired effect is to have the lights in the home turn on one by one when the family unlocks the lock. This linkage between the door lock and the lights, illustrated in Figure 3, triggers the ‘home mode’ of the smart lighting system, which requires a comprehensive smart home setup. The system evaluates three aspects of state information: action, time, and person.
“Action” involves the smart home system recognizing whether the action of going home is occurring. This is determined by detecting the opening state of the smart door lock or the response state of the door and window sensor. The “time” element refers to the earliest time when the mode can be triggered, and the smart home system determines whether it is necessary to turn on the lights by checking the current time. The “person” element requires the smart home system to ascertain whether the family member who opens the door is the first one returning home, repeating as necessary.
Therefore, when the three elements meet the whole family requirements of the “Going Home Mode,” such as when the first family member who returns home opens the door at 6 o’clock in the evening, the intelligent lighting system will trigger the “Going Home Mode” accordingly.”
2.Grouping and Delay: Creating Progressive Lighting
To fully embrace the sense of ritual achieved by the ‘home mode,’ you can employ progressive lighting techniques. The design approach for progressive lighting involves utilizing the grouping and delay functions of intelligent lighting systems to create layered lighting effects in both time and space. Once the lamps are grouped, those belonging to the same lamp group will illuminate simultaneously. By introducing a certain time interval, different lamp groups can be lit up sequentially.
The lighting fixtures within the space are categorized into low, middle, and high sections based on the height of the light sources. The allocation of these sections should be determined according to the specific dimensions of the home space. For instance, in a 3m high space, the area below 0.5m is considered the low section, while the region above 2.8m is the high section, and the space between them constitutes the middle section (see Figure 4).
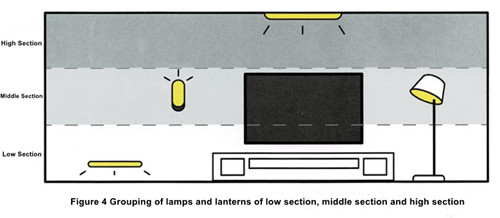
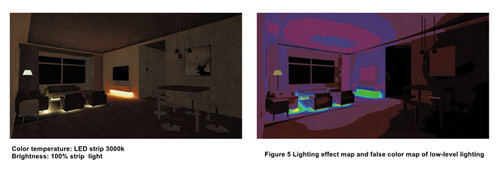
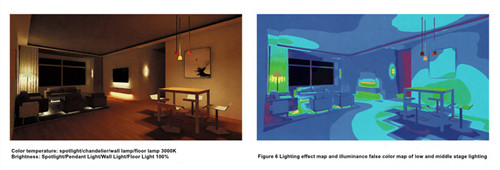
Upon triggering the ‘Going Home Mode,’ the lights in the low section will illuminate first, followed by those in the middle and high sections, with a set time interval in between. This creates a progressive lighting effect, transitioning ‘from low to high.’ Additionally, the brightness levels for the low, middle, and high segments can be individually adjusted. Typically, the low section’s lighting has a lower brightness, primarily to set the atmospheric ambiance. The middle section’s brightness is slightly higher to enhance the sense of space and depth, while the high section’s lighting is appropriately elevated. This not only increases the overall room brightness but also creates a visual effect of raising the ceiling height (refer to Figure 5 to Figure 7).
Remark:
Color temperature: led light strip 3000k
Brightness: led light strip 100%
Remark:
Color temperature: spotlight/chandelier/wall lamp/floor lamp 3000k
Brightness: Spotlight/Pendant Light/Wall Light/Floor Light 100%
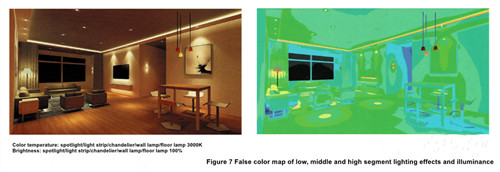
Remark:
Color temperature: spotlight/led light strip/chandelier/wall lamp/floor lamp 3000k
Brightness: spotlight/led light strip/chandelier/wall lamp/floor lamp 100%
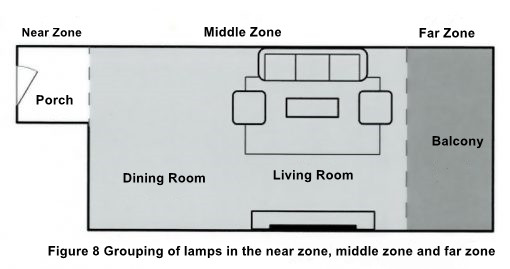
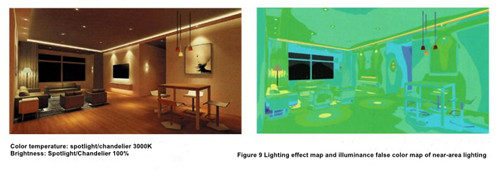
If the vertical space is spacious, encompassing areas like the entrance, living room, dining room, and balcony, you can consider another progressive lighting method. This approach involves the lighting system in the entrance, dining room, living room, and balcony gradually illuminating in a ‘by’ and ‘near to far’ manner, following a set time interval (see Figure 8). For design inspiration and lighting effect examples, you can refer to Figure 9 to Figure 11.
This method allows for a simple division based on the space’s function, making it easy to understand and implement.
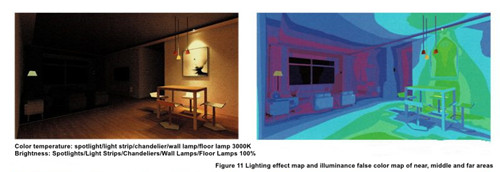
Remark:
Color temperature: spotlight/chandelier 3000k
Brightness: Spotlight/Chandelier 100%
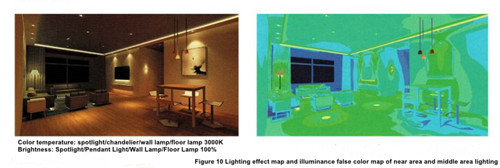
Remark:
Color temperature: spotlight/led light strip/chandelier/wall lamp/floor lamp 3000k
Brightness: spotlight/led light strip/chandelier/wall lamp/floor lamp 100%
Remark:
Color temperature: spotlight/led light strip/chandelier/wall lamp/floor lamp 3000k
Brightness: spotlight/led light strip/chandelier/wall lamp/floor lamp 100%
If the home space is large, you can combine the two progressive lighting methods of ‘from low to high’ and ‘from near to far’ to accentuate the layering and depth of the space. The design technique of progressive lighting is versatile and applicable not only to the ‘home mode’ scene but also to other intelligent lighting scenes. For instance, in the upcoming ‘Sleep Aid Mode’ section, the progressive lighting design method is employed to create a more comfortable and healthy light environment that aligns with people’s circadian rhythm.
Step by step, easy to achieve “home mode”
Step 1: Design the lighting points
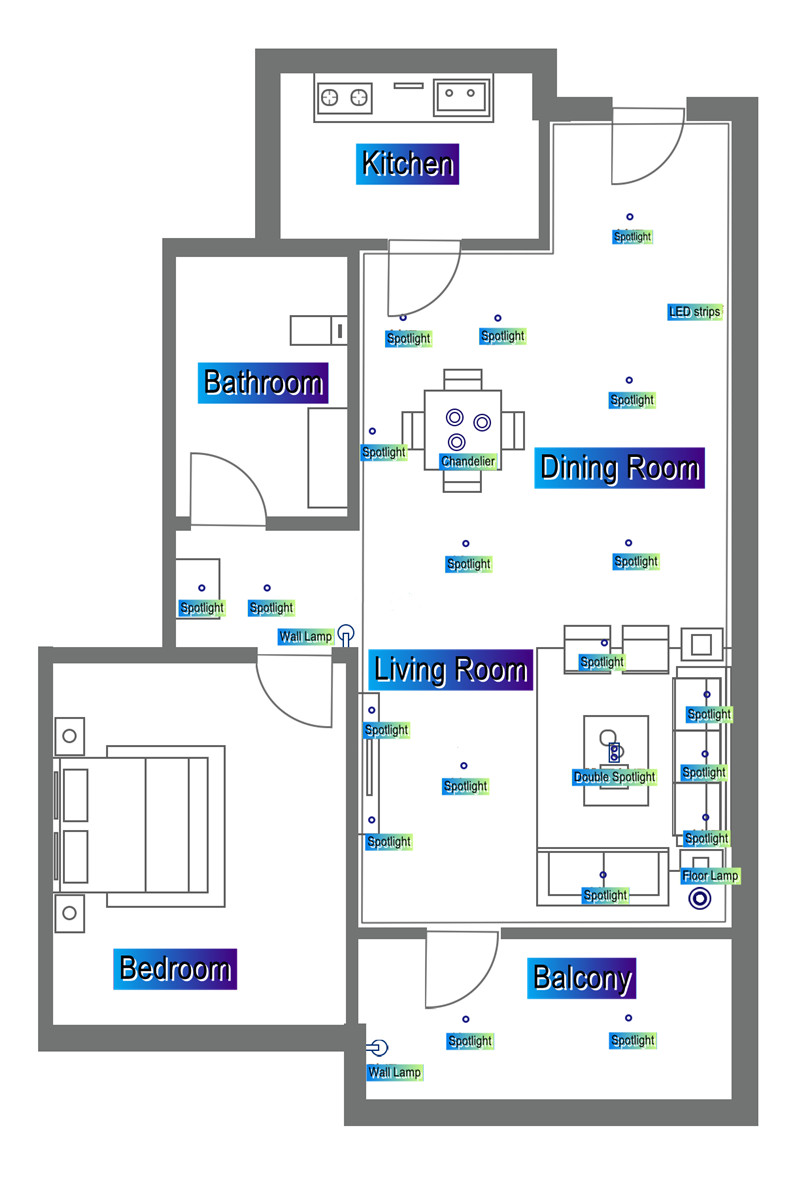
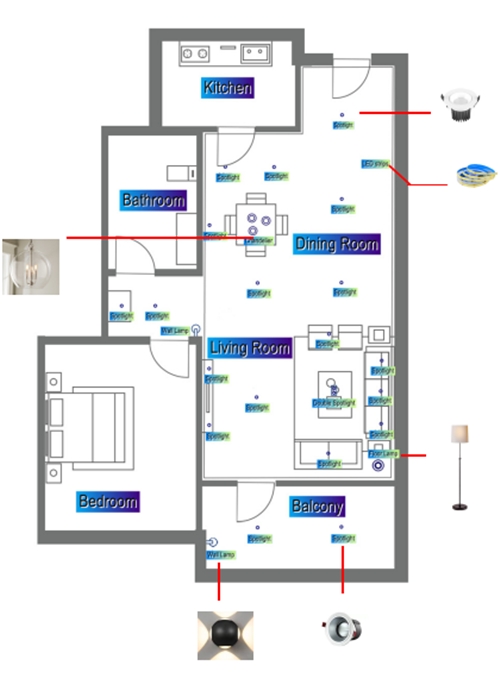
Using the design case presented in this article as a reference (Figure 12), proceed to complete the lighting point design for the entrance, dining room, and living room. For these four spaces, namely the entrance, dining room, living room, and balcony, utilize seven types of lamps: downlights, spotlights, double-headed spotlights, chandeliers, light strips, wall lamps, and floor lamps. Typically, when the designer provides the location map of the lamps, they will also include a product overview for your reference (see Figure 13). Once the spatial layout of the light sources and the lamp types are determined, group the lamps according to the design principles of ‘from low to high’ or ‘from near to far’ progressive lighting.
Step 2: Purchasing Lamps and Smart Linkage Equipment
After completing the design work mentioned above, you can proceed to purchase the necessary lamps and intelligent linkage equipment. The market offers a wide variety of smart lamps, smart door locks, and voice speakers from different brands to choose from. In this guide, we will provide a suggested combination that can meet the needs of most families, serving as a reference. However, it is essential to select equipment that aligns with your preferences, fits your budget, and complements your home’s decoration style.
Considering the potential integration with other smart devices, the solutions presented in the tables below (Table 1, Table 2) utilize wireless Bluetooth (BLE Mesh) connections for the lamps. This choice allows for a seamless and rapid batch device access, even if the number of lamps exceeds 20.
Table 1 “Home mode” lamps
|
Fixture Name |
Fixture Size
(mm) |
Power
(W) |
Color Temperature
(K) |
Beam Angle
(°) |
Quantity | Fixture Image |
| Recessed Round Spotlight | Φ93 * 73.5 | 10 | 2700-6500 | 24 |
17 |
|
|
Recessed Round Spotlight |
Φ93 * 73.5 | 10 | 2700-6500 | 90 |
2 |
|
| 150*75*75 | 10 | 2700-6500 | 24 | 1 | ||
| 100*30*50 | 8 | 2700-6500 | 120 |
2 |
||
| LED Strip Light | Standard length 1m | 6W/m | 2700-6500 | 120 |
35m |
|
| 180*670*1200 | 24 (8W*3) | 2700-6500 | 120 | 2 | ||
| Floor Lamp |
240*246*1625 |
12 | 2700-6500 | 120 |
1 |
Table 2 “Home mode” smart linkage equipment
|
Device Name |
Function | Basic Parameters |
Product Image |
|
Smart Door Lock |
Fingerprint unlocking, trigger and
linkage with “Home Mode” |
Unlocking Methods: Fingerprint/Password/Bluetooth/Manual Key Fingerprint Type: Integrated Semiconductor Fingerprint |
|
|
Smart Voice Speaker |
Linkage and play “Welcome Home” voice |
Display Size: 93mm*55mm Wireless Connectivity: Wi-Fi 2.4GHz; Bluetooth 5.0 |
|
| Smart Multi-mode Hub | Bluetooth Mesh Networking,
intelligent linkage |
Wireless Connectivity: Wi-Fi 2.4 GHz; Zigbee 3.0; Bluetooth 5.0 |
|
Step 3: Configuring Lighting Rules and Smart Linkage Rules
In this step, the lighting and intelligent linkage rules will be configured using a ‘near to far’ progressive lighting method.
(1) Connect the devices to the smart home system
Follow the product instructions to connect the smart door lock and lamp speakers to the smart home system through the gateway.
(2) Group the lamps
Create three separate light groups for the ‘near’ zone (entrance), ‘middle’ zone (living room and dining room), and ‘far’ zone (balcony), naming them as ‘entrance,’ ‘dining room,’ and ‘balcony,’ respectively.
(3) Configure the lamp settings
Adjust the brightness of the three areas to 70% and set the color temperature of the lights in the entrance area to 2700k for a warm ambiance. Set the color temperature of lights in other areas to 3000 to enhance their bright atmosphere . You can adjust the color temperature and brightness by pressing and holding the screen.
(4) Set the linkage rules for lamps and voice assistants
As illustrated in Figure 16, start by creating the ‘execute’ command, which represents the joint calculation rule between the lamp and the voice assistant. Name this linkage scene ‘go home mode.’ Next, nest this linkage scene within the next linkage, using the door lock as the ‘just execute’ command. Select the lights in the ‘near,’ ‘middle,’ and ‘far’ areas as the execution action, and set the time interval to 2 or 1 second. After turning on all the lights, configure the voice assistant to play “Welcome home” or other desired voices.
(5) Set the linkage rules of the door lock
Set the trigger condition of the “if” command to the opening of the smart door lock. In the “execute” command, the first command is the linkage rule of the light and voice assistant set in the previous step. What needs special attention is that, 2 seconds after the end of this command, a command to turn off the “if” command will be executed, that is, the entire smart linkage function will be turned off. The purpose of this is to ensure that the “going home mode” is only executed once, that is, only the first member to go home executes the “going home mode”. Finally, set the effective time period of the smart linkage according to the usual living habits, and the entire smart linkage rule is set.
3. The Entry-Level “Home Mode” for Novices
In the above-mentioned ‘Going Home Mode’ strategy, a smart door lock is utilized as the smart linkage device for the door opening action, and various spotlights, such as tube spotlights, are used for space lighting. If you have a limited budget for equipment purchase or prefer ceiling lights, you can try the entry-level version of the ‘Home Mode,’ which still produces excellent results.
The entry-level version of the ‘Home Mode’ uses a door and window sensor as a sensing device for door opening instead of a smart door lock. The intelligent ceiling lamp is then employed to achieve the smart linkage effect of the ‘Home Mode.’ When the door is opened, the door and window sensor judges the opening and closing status of the door by sensing the accessory magnet.
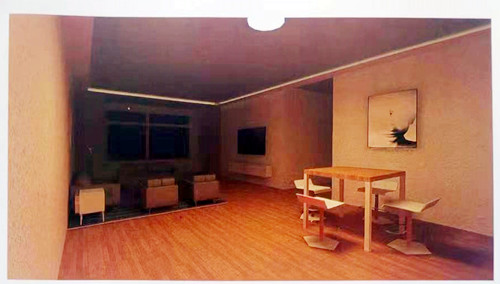
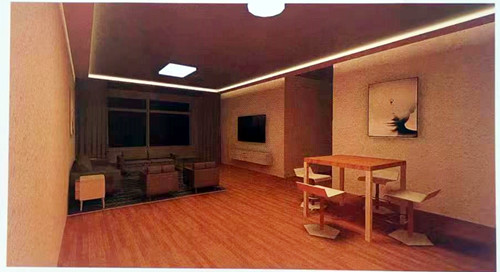
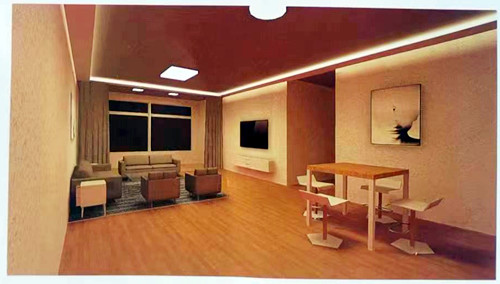
Even with just ceiling lamps, the lighting design can still follow the progressive lighting principle of ‘from near to far’ or ‘from low to high.’ For instance, adopting the simplest ‘from near to far’ approach, you can divide the entrance, living room, and balcony into the near area, middle area, and far area, respectively. Each partition would have only one or two ceiling lamps, creating the lighting effects as shown in Figure 18 to Figure 20. Similarly, when the door is opened, the ceiling lights in different areas will gradually illuminate according to a specific time interval.
For the selection of door and window sensors and smart ceiling lights, we provide a recommended combination that is generally suitable for most families, as shown in Table 3 and Table 4, for reference.
Table 3 Entry-level “home mode” smart ceiling lamp
|
Fixture Name |
Fixture Size (mm) | Power (W) | Color Temperature (K) | Fixture Image |
|
Smart LED Ceiling Light (450) |
Φ450 | 32 | 2700-6500 | |
| Square LED Ceiling Light | 960*640 | 90 | 2700-6500 | |
| Smart LED Ceiling Light | Φ320 | 28 | 2700-6500 |
|
Table 4 Entry-level “home mode” smart linkage equipment
|
Device Name |
Function | Basic Parameters | Product Image |
|
Door/Window Sensor |
Detects door/window opening, triggers
“Home Mode” linkage |
Response Time: 15ms
Wireless Connectivity: Zigbee |
|
| Touch Screen Speaker | Links and plays “Welcome Home” voice | Display Size: 93mm*55mm
Wireless Connectivity: Wi-Fi 2.4 GHz; Bluetooth 5.0 |
|
| Smart Multi-mode Hub | Bluetooth Mesh Networking,
intelligent linkage |
Wireless Connectivity: Wi-Fi 2.4 GHz; Zigbee 3.0; Bluetooth 5.0 |
|
The setup process for the lighting and smart linkage rules in the entry-level version of the ‘Home Mode’ is similar to and simpler than the steps introduced in the previous section. In this case, the door and window sensor’s open state will replace the fingerprint unlock state of the smart door lock in the ‘if’ command. The ceiling lights in the porch, living room, dining room, and balcony will replace various point light sources (refer to Figure 21 and Figure 22). Although these ceiling lamps are grouped similarly to BLE Mesh lamps, the number of ceiling lamps is minimal, and they can be added one by one in the linkage setting. This makes it a simpler and more manageable way to implement the ‘Home Mode.’


